Git is an open source and free distributed version control system (VCS) used for software development. The primary features that Git offers have seen it soar in popularity as one of the most commonly used VCSs used today.
The importance of using a version control system like Git cannot be stressed enough. Doing so allows a developer the freedom to experiment and test alterations in his or her code without fear of losing any previous work. With a VCS, every change that has been made or will be made in the future is meticulously logged and stored, such that any developer on the team can retrieve code or a version of a file from anywhere and at any time down the line. For a developer, a VCS is like your wallet or car keys: You never leave home without it!
Below we’ll examine the basics with a complete yet brief Git tutorial for beginners who are interested in getting started with a secure version control right away! Don’t feel like reading? You can check out this video tutorial that breaks down Git and Github for you in 7 minutes.
Coming to Terms with Terms
Before exploring the details of Git specifically, let’s briefly define some commonly used terms surrounding software version control.
- Version Control System (VCS): A software application that records changes made to a set of files over time, allowing specific historical versions to be recalled and restored as necessary.
- Revision: An alteration to a particular file (or set of files), historically recalled and remembered by the VCS using an assigned number or unique identifier.
- Repository: A shared database with a full revision history of all files under version control.
- Committing or commit: When a modified file is placed back into the repository, thus indicating a revision has occurred, this is considered a commit of the file.
Those four terms should get us through the introduction to Git, but you are encouraged to learn more and explore some of the other common terms.
The Core Features of Git
Git itself provides a handful of benefits that make it superior in many ways to other common VCSs.
- Speed: Git is typically one of the fastest and most responsive VCSs out there, often anywhere from 10 to 100 times faster than Apache Subversion, another popular form of version control.
- Branching: Easily among the most powerful and somewhat unique features of Git is branching, which allows development within a repository to occur simultaneously within completely separate branches. Revisions in unique branches will have no effect on one another until those branches are merged (joined together) at a later time.
- Staging: The staging space is an intermediary file area, conceptually similar to limbo, where files go between the standard repository database but before they are committed and saved as a new revision. Within the staging area, files can be edited multiple times before commitment occurs, reducing the number of unnecessary versions in the system.
- Distribution: Git is a distributed VCS, which means it has no need for a centralized repository where all team members must commit changes. This makes Git particularly well suited for open source projects and workflows spread across large networks or distances.
Using Git
Getting started with Git is very simple. For these examples, we’ll assume basic knowledge of opening a terminal window on your development machine.
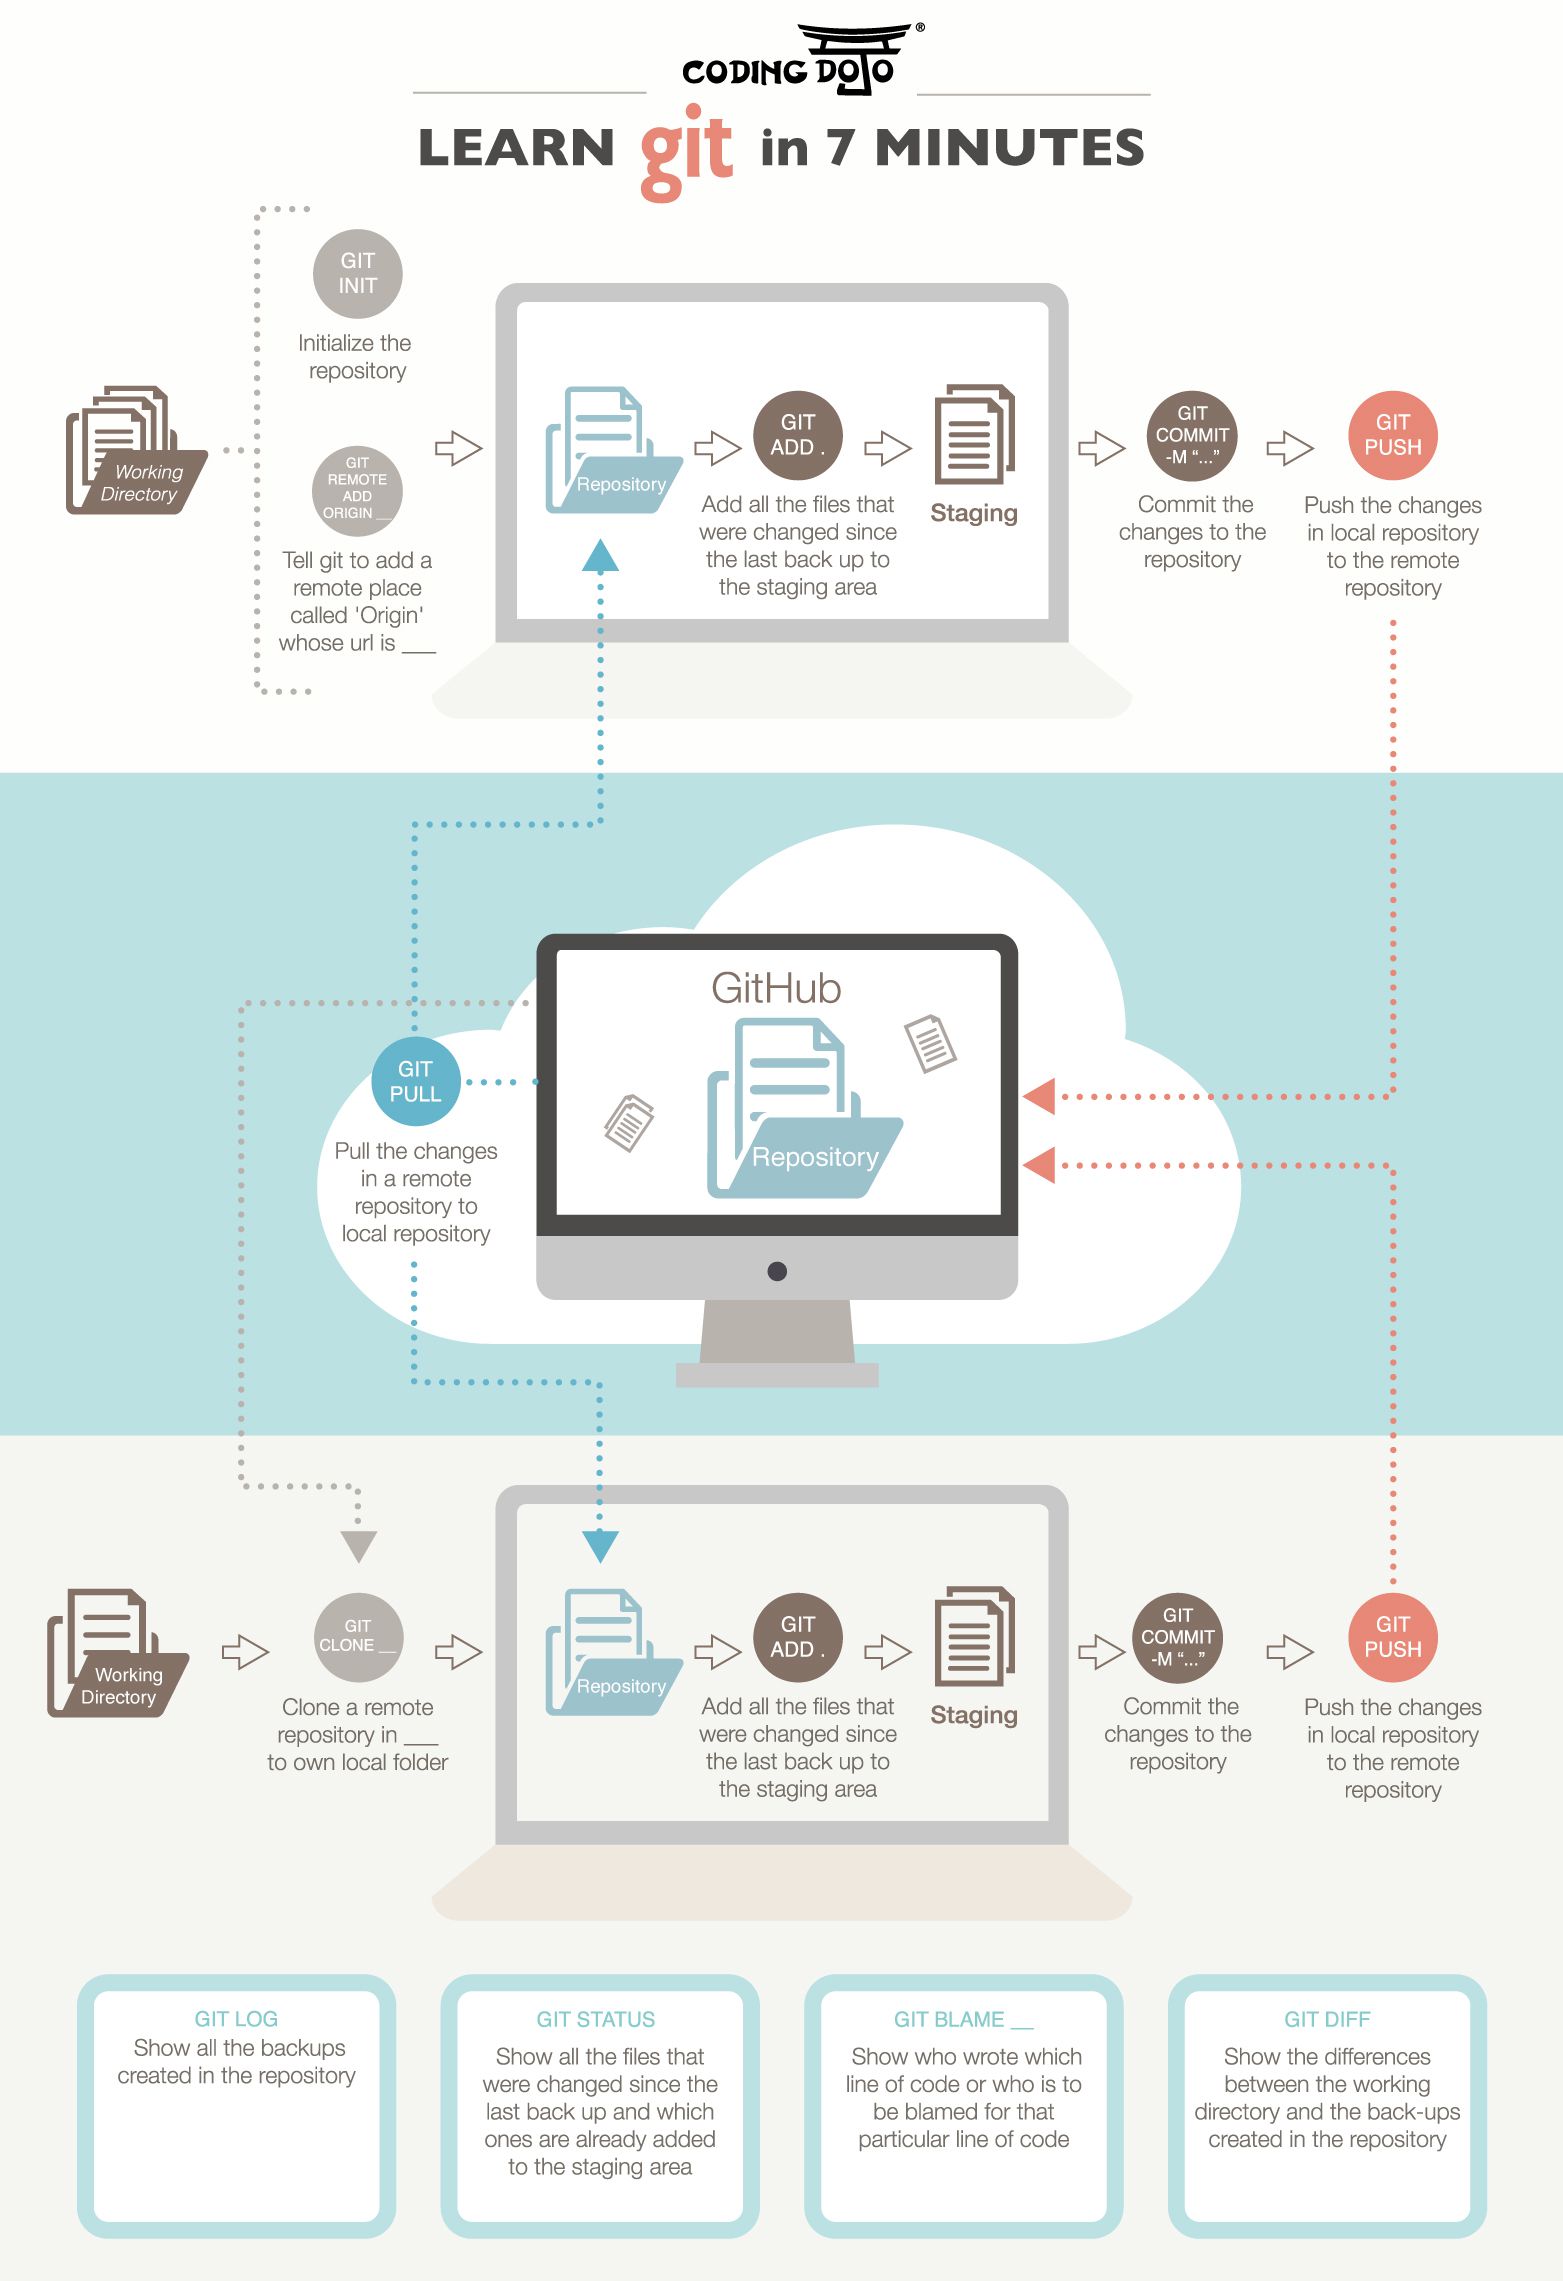
Initializing the Repository
From the terminal, navigate to the root directory of your project and enter git init to generate a new Git repository:
root@dev:~ $ cd ~/project
root@dev:~/project $ git init
Initialized empty Git repository in /home/root/project/.git/
As indicated, the entire repository of Git will be stored in the .git subdirectory, which you will never need to interact with directly.
Adding a File
With the repository created, now we need to add some files to be version controlled. This can be accomplished by adding specific files by name using the git add command:
root@dev:~/project $ git add data.xml
To save time and effort, you can also add all new or modified files in the working directory at once:
root@dev:~/project $ git add .
Checking the Status
Many commands such as git add will not produce any output, so often it is useful to check the status of the Git repository to determine what Git is preparing to do next, such as which files are waiting to be committed:
root@dev:~/project $ git status
On branch master
Initial commit
Changes to be committed:
(use “git rm –cached <file>…” to unstage)
new file: data.xml
This tells us that git is waiting to commit the new file ‘data.xml’ that was added to the repository earlier.
Committing Changes
Once a change has been made, it is best practice to commit that change to the repository. All commitments in Git require a commit message, which is a simple description of the change(s) made by the developer within the commit.
To accomplish this, use: git commit -m “message”:
root@dev:~/project (master) $ git commit -m “Added data.xml”
[master (root-commit) b417234] Added data.xml
1 file changed, 0 insertions(+), 0 deletions(-)
create mode 100644 data.xml
Viewing the Commit Log
As you alter your repository, you may wish to view a transaction log of commits that have been made, detailing the author, date, and modifications that occurred, a task easily accomplished the with git log command:
root@dev:~/project (master) $ git log
commit a1df23be53ee8721e18ac35e86650a2800a072c0
Author: Bob <bob@codingdojo.com>
Date: Mon Aug 3 20:44:03 2015 +0000
Added data.xml
Viewing Local Differences
As files throughout the repository are modified relative to versions previously committed, you may wish to view those changes or differences. The git diff command is a simple way to query those changes.
First let’s change our data.xml file slightly so we have a change or diff to detect:
root@dev:~/project (master) $ echo “<item>New Item</item>” > data.xml
After modifying a tracked file, we can now run the git diff command to see the changes made since the previous commit:
root@dev:~/project (master) $ git diff
diff –git a/data.xml b/data.xml
index e69de29..b92e3a0 100644
— a/data.xml
+++ b/data.xml
@@ -0,0 +1 @@
+<item>New Item</item>
Remember to commit the latest changes:
root@dev:~/project (master) $ git commit -am “Updated data.xml”
[master 11cfabb] Updated data.xml
1 file changed, 1 insertion(+)
Viewing Commit Authorship
As development continues — particularly as new team members are involved — it may be useful to view the person (or author) responsible for a particular change. This can be accomplished using the git blame [file] command:
root@dev:~/project (master) $ git blame data.xml
11cfabb4 (bob 2015-08-03 21:12:26 +0000 1) <item>New Item</item>
Here we see that Bob is responsible for the latest addition to the data.xml file.
Adding a Remote Repository
While a local Git repository is necessary for tracking your own work and modifications, eventually most workflows will require uploading (pushing) your local changes or commits to a remote repository. With multiple team members pushing and pulling from this same remote location, the project remains up-to-date for everyone involved.
To work with a remote repository (such as GitHub), you’ll need to inform your local repository about the name and url of the remote repository with the git remote add [name] [url] command. Generally, it is best practice for the primary remote to be named origin, so adding a remote repository from Github might look like this:
root@dev:~/project (master) $ git remote add origin https://github.com/bob/project.git
Now we can safely issue git push commands to commit our local changes to the remote repository.
Pushing to a Remote Repository
After work completes for the day or whenever desired, it is often a good practice to push your local repository and changes therein to a remote repository (such as GitHub) that is accessible by other developers. You can specify the particular remote repository to push to (by name or url), but typically a standard git push command will suffice:
root@dev:~/project (master) $ git push
Writing objects: 100% (3/3), 295 bytes | 0 bytes/s, done.
Total 3 (delta 2), reused 0 (delta 0)
To git@git.github.com:user/project.git
7438a2a..1a5d55a master -> master
Pulling from the Remote Repository
When a fellow developer wishes to begin coding in the project, he or she will begin by issuing a git pull command to download all the latest repository information from the remote repository to his or her local repository, ensuring everything is up-to-date:
root@dev:~/project (master) $ git pull
Once the local repository is updated, any conflicting files will be observed and conflicts must be resolved, after which point editing can begin as normal until the local repository needs to be pushed back to the remote repository once again, and the process repeats until development is complete!
Cloning a Remote Repository
What happens when you wish to begin working with an existing remote repository but don’t have a local copy of that repository on your machine? You simply use git clone [url] to download the remote repository and create a local repository on your computer:
root@dev:~/project (master) $ git clone git@github.com:bob/project.git
Cloning into ‘project’…
remote: Counting objects: 548, done.
remote: Total 548 (delta 0), reused 0 (delta 0), pack-reused 548
Receiving objects: 100% (548/548), 977.70 KiB | 0 bytes/s, done.
Resolving deltas: 100% (348/348), done.
Checking connectivity… done.
Now the local repository includes all commits and even remote repository information, so modifications you make in the future can quickly be pushed to the remote repository for the rest of the team to view and work with.
There’s Plenty More Where That Came From
While we’ve just barely and oh so gently caressed the tip of the iceberg, there are plenty more cool features and commands to learn with Git. Check out this handy infographic, this simple tutorial video, or even the official Git documentation to really dig deep and get your hands dirty with the glorious version control system that is Git!